Last time, in "Lights! Camera! Action!", we learned a trick on how to brighten up a picture before even shooting it, possibly avoiding a picture that is too dark. This time were going to go over how to most quickly organize your pictures, along with a quick reminder on how to maximize your photos as wallpapers or contacts.
First up on the agenda is organizing your pictures. If youre like me, you use the handy pocketable Centro to snap pictures left and right like theres no tomorrow, but later end up having to scroll through a million pictures to show someone that Pulitzer prize winning picture you took a month ago.
For this reason, I aim to focus on making it more of a snap to organize your pictures. (Wow, three camera puns in one sentence!). Although you can enable the Media conduit on your HotSync preferences to sync your pictures to your PC, the more pictures you take, the longer a HotSync takes. And although you have the ability to create and edit albums on the Centro using the Pics&Videos application, or on the desktop using the Palm Desktop application, there is simply no faster way to organize your photos than to use the Centro as a USB device on your computer, then use the computers speed to do all of your picture management. If you havent already invested in an application like Card Export or Card Reader, stop reading this, go get one, then come back. Sure, you can take the cheap way out and swap the micro SD card back and forth between your Centro and your computer, but if you do that youll notice that (1) it kills the whole time saving thing, and (2) is it me or have these cards finally gotten TOO small?! Theyre not kidding when call this thing a micro SD. You need a microscope to handle it. After dropping it enough times, drop a few bucks and just get the card reader program.
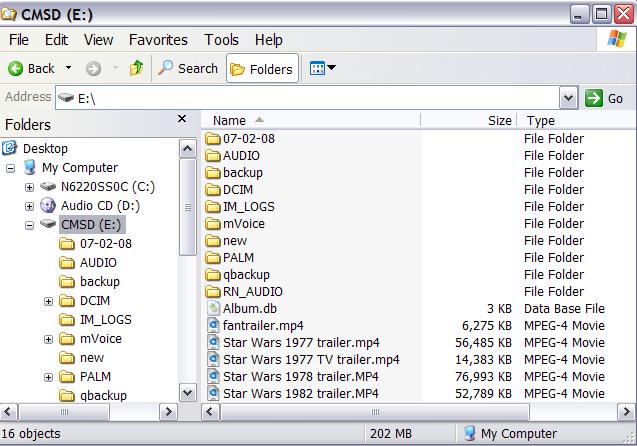
Okay, so with your Centro connected to your PC or Mac as an external USB device, the rest is file management basics. Open up your Centros SD card on the Mac or PC (pictured here as my E: drive) and go to the DCIM directory. This is where you will find all of your pictures and albums. Any subdirectory under the DCIM directory will appear as an album in the Pics&Videos application on the Centro. Just create, delete, and rename directories here, and they will show up that way as albums on the Centro. Similarly, copying, deleting, or renaming picture files in these directories will show up that way on your Centro. If you havent been doing it this way, you will wonder why when you see how much faster this is.

Pointers
Three quick pointers:
- When creating albums on the Centros card via your PC, remember to create the directory under DCIM, not under any of its subdirectories. In other words, if you create a directory called Vacation under DCIM\Palm (ie, DCIM\Palm\Vacation) and move some pictures into the Vacation directory, you will see neither the Vacation album nor the pictures on the Centro. The files will still be there, but they are not where the Pics&Videos application needs them to be in order to see them. In this case you would just move the Vacations directory up one level (DCIM\Vacation) in order to see the album and its pictures on the Centro.
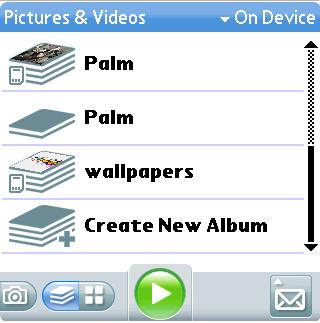
- You will notice there are two albums called Palm on the Centro. One resides on your card, the other in main memory. This is because someone thought it was a good idea to have an album on internal memory called Palm, AND a default album on the card with the same name. The way to distinguish them is by noticing that the Palm album on the card has a little SD card icon in front of it, but it is still too easy to forget (Is that a RAM icon or an SD icon? Oh yeah, its an SD icon. Okay.) And dont bother trying to delete or rename the DCIM\Palm directory on your card. It will simply get created again! You can change the directory that your pictures will go to in the Camera app, but it does not save this directory. As soon as you go back into the Camera app, there is that Palm directory again! Just consider the Palm directory as a temporary directory, let your pictures go there, and move them to your customized albums later.

- Finally, you can always get the same picture management functionality with a nifty file management program for the Centro like Filez or Resco Explorer, or a third party picture application like Splash Photo, but after spending enough time with these otherwise cool applications, I constantly found myself reconnecting the Centro to the PC and doing it that way. Its just much faster, especially when it comes to renaming and dragging pictures around into your albums.
Cool Wallpaper!
For those who dont know (dont worry, I wont tell anybody), turning a picture into a wallpaper or a contact is as easy as opening the picture on the Centro, going to the Options menu, then selecting Save as Wallpaper or Save as Contact. Couldnt be simpler. And since you can copy files quickly from your computer to the Centro, you can experiment with pictures more easily to see which ones make the coolest wallpapers. For those like myself who suffer from backgrounditis, the disease that makes picking a cool wallpaper as important as choosing a spouse or career, youll notice that what looks great as a background on your desktop does not always work as a background on the little phone screen. In my vital research in this important area, I have found that less is always more. The shortcut to finding the coolest wallpapers is to just KISS (Keep it simple, stupid!).

As a quick reminder, if you want to display more of your wallpaper, go to the Options menu, select Phone Display Options and change Rows to 1, or take off Show Favorite Buttons altogether since you can always scroll down to your favorites.
Well, now that we know how to lighten up and organize our pictures, next time well have fun defacing them!
Next time: Part 3: Action!